


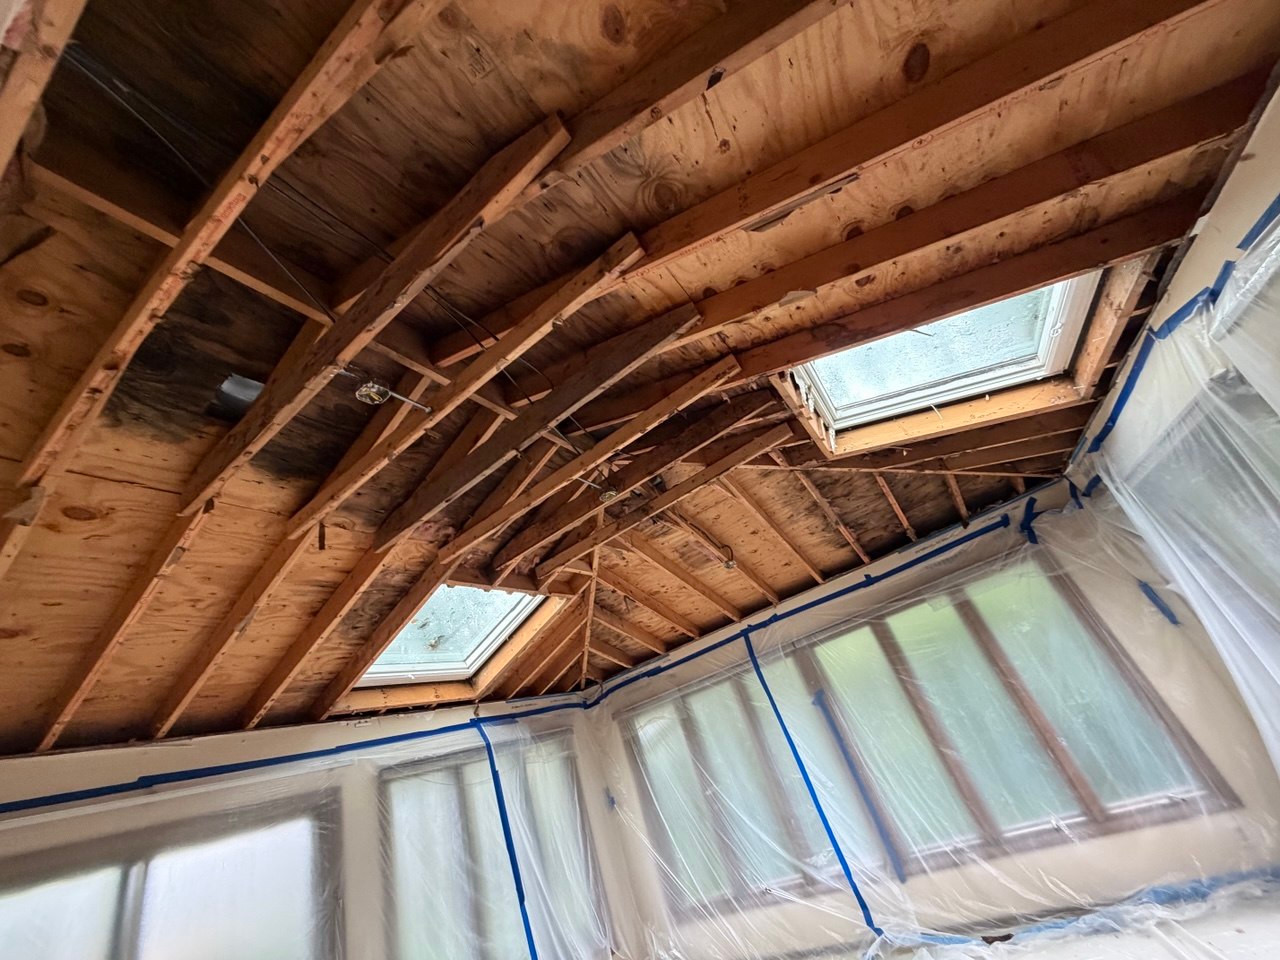
Once a roof leak is repaired, the ceiling work still needs its own assessment. The visible stain may require a small repair, while damaged board or affected insulation can make the project more involved. A useful proposal explains what will be removed, what must happen before the ceiling is closed, and how the room will be finished.
Two EasyPatch projects show different ceiling-repair scopes: a damaged-section replacement after a roof leak in Wheaton, and a full ceiling drywall replacement with insulation installation in Batavia. They are examples of completed work, not a way to diagnose another home's damage from its location.
1. Confirm the leak repair and readiness for interior work
Give the ceiling contractor the roof repair details and any drying or restoration records. Confirm who is responsible for assessing moisture, insulation, framing, and possible contamination before reconstruction begins. If those questions are unresolved, a finished ceiling can hide problems that still need attention.
USG's water-damage guidance emphasizes correcting the moisture source and making replacement decisions for the particular situation. It also notes that moisture or mold can exist within the material or cavity, beyond what is visible on the surface.
Keep clear of unstable ceiling material. If water reached wiring or fixtures, have the electrical issue handled before ceiling work. The CDC's electrical safety guidance calls for qualified inspection of wet electrical equipment before power is restored. Do not enter a wet or unsafe area to investigate.
2. Define the replacement area and protect the room
The repair boundary should be based on damaged material, access needs, and how the replacement will be supported. It may not follow the exact outline of the stain. Ask the contractor to point out the proposed boundary and explain whether additional findings could change it.
Before work starts, agree on furniture access, floor and surface protection, dust control, and debris removal. For older coatings or textured ceilings, resolve any suspected hazardous-material concerns before disturbance. Also identify who will handle light fixtures, fans, trim, or other items that interfere with the repair.
3. Address the open cavity before installing new board
An opening provides access to areas that were previously concealed. This is the point to confirm whether insulation replacement or work by another trade is needed. The written scope should distinguish included work from conditions that require a revised estimate.
New drywall should not close in unresolved moisture. Ask who confirms the affected materials are ready, what that assessment covers, and whether any required restoration work is complete. A drywall installation date should follow those decisions.
4. Install and finish the replacement
New board must fit the existing construction and have appropriate support. The material and installation method should suit the ceiling assembly, including any applicable fire-resistance requirements. Filling the opening is only part of the work; the joints and transition into the existing surface need finishing too.
USG's panel installation and finishing guide describes replacement-section repair with secure attachment, joint tape, layered compound, and preparation for primer. Finishing spreads beyond the opening to make a gradual transition. This explains why the worked-on area often looks wider than the piece of board that was replaced.
Texture matching, where needed, and the compound's drying requirements affect the finishing sequence. Ask about expected visits after the materials and finish are known rather than assuming every ceiling repair fits one appointment.
5. Agree on primer and the painting boundary
Ask whether the quoted finish is ready for primer, primed, or fully painted. These are different stopping points. Remaining stains on sound material may need a suitable stain-blocking primer, and the topcoat area should be stated separately from the drywall replacement area.
A localized board repair can still be followed by painting the full ceiling or additional walls if that is the agreed finish scope. The size of the removed section does not automatically determine how much painting is included.
What the Wheaton and Batavia projects included
In our Wheaton ceiling repair after a roof leak, the work included replacing the damaged ceiling section and painting the ceiling and walls.
The Batavia ceiling replacement project had a broader installation scope: insulation installation, full ceiling drywall replacement, and painting the ceiling and walls. The comparison shows why it helps to ask separately about board replacement, insulation, and painting when reviewing an estimate.
Start with photos and the leak history
Send a wide room photo and a closer damage photo taken from a safe location. Include your city, ceiling height, what repaired the leak, any completed drying work, and your preferred finish. We provide drywall repair in Wheaton and Batavia.
Request a free EasyPatch estimate or text (312) 200-1230. We can start reviewing the scope from photos; concealed conditions may require an on-site assessment.
